
고정 헤더 영역

상세 컨텐츠
본문
728x90
반응형
가끔 가다 써먹는 CSS 가상클래스(::before)를 이용한 디자인
(::after도 가능은 하겠지만 아직 디자인적인 요소로 사용한 적이 없어서......거의 clear:both 용도로만.....)
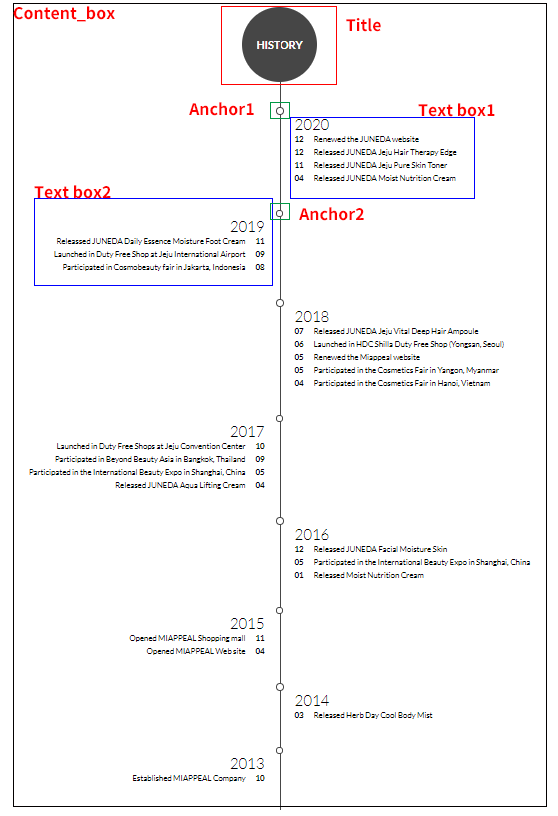
아래 이미지는 이해를 돕기위한 이미지 이며 실제로 사용하기 위해서는 폰트색깔이든가 사이즈는 알아서 조정하면 될듯 싶다.
css 구문
content {position:relative} --> 내용 전체를 감싸주고 있는 박스
content:before {content:""; position:absolute; height:100%; width:1px; left:50%; background:#000} --> content 첫 가상요소를 잡아주는 내용으로 전체 중 가운데 검은색 라인을 표시
title {margin:0 auto; text-align:center; width:150px; height:150px; border-radius:50%; line-height:150px; background:#000; color:#fff} --> 그냥 제목 이미지의 Title
textbox_r {position:relative; width:50%; text-align:left; left:50%} -->오른쪽 텍스트 박스의 정렬 이미지의 Text_box1
textbox_r:before {content:""; position:absolute; width:15px; height:15px; border-radius:50%; border:1px solid #000; background:#fff; top:0; left:-7px; z-index:5} --> textbox_r 첫 가상 요소를 잡아 주는 내용으로 이미지의 Anchor1 이다.
textbox_l {position:relative; width:50%; text-align:right; left:0} -->왼쪽 텍스트 박스의 정렬 이미지의 Text_box2
textbox_l:before {content:""; position:absolute; width:15px; height:15px; border-radius:50%; border:1px solid #000; background:#fff; top:0; right:-7px; z-index:5} textbox_l 첫 가상 요소를 잡아 주는 내용으로 이미지의 Anchor2 이다.
728x90
'쿠쿠 작업장(home page) > css' 카테고리의 다른 글
| css3 가로세로 정렬 (0) | 2019.04.09 |
|---|---|
| css accordion (0) | 2019.04.05 |
| css 반응형 정사각형 만들기 (0) | 2019.02.13 |
| css(css1) vertical-align (0) | 2017.12.14 |
| 가상클래스(nth-child,nth-last-child,nth-last-of-type,nth-of-type) (0) | 2015.12.04 |


댓글 영역